The cleanroom mop bucket isn’t a commodity janitorial supply—it’s a contamination control device that determines whether your disinfectant reaches validated contact time or gets diluted to ineffective concentrations before it touches the floor. Choose the wrong bucket configuration and you’ll see environmental monitoring excursions, audit findings for inadequate cleaning validation, and the expensive investigation cycles that follow. Configure it correctly—matching bucket system design to your ISO class, disinfectant rotation, and sterilization capacity—and you’ve built a validated cleaning workflow that survives regulatory inspections and prevents the cross-contamination events that halt production. This guide breaks down the engineering logic behind single-, dual-, and triple-bucket systems, explains why wringer mechanism choice affects particle generation and autoclave durability, and provides decision frameworks for material selection (stainless steel versus polypropylene), EU GMP Annex 1 compliance, and complete SOP integration. Whether you’re designing a greenfield pharmaceutical facility or resolving recurring EM failures in existing operations, you’ll find the technical specifications and validation workflows to build cleanroom mop bucket systems that deliver reproducible contamination control.
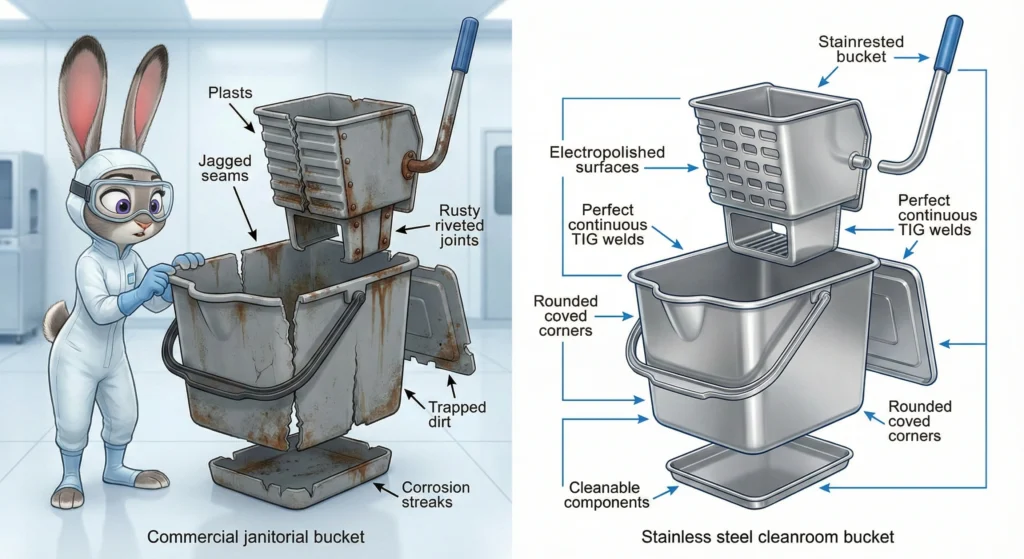
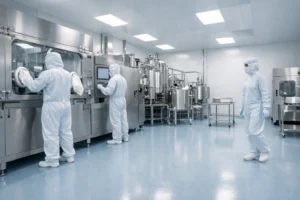
Figure 1: Complete triple-bucket mopping system in pharmaceutical Grade B cleanroom showing proper gowning (sterile gown, gloves, face shield), stainless steel bucket cart with segregated fluid streams (disinfectant/rinse/waste), and wringer mechanism positioned for contamination control. This configuration meets EU GMP Annex 1 requirements for sterile cleaning tools and validated contamination control workflows in aseptic processing areas.
What Makes a Cleanroom Mop Bucket Different?
Why Standard Commercial Buckets Fail in Cleanrooms
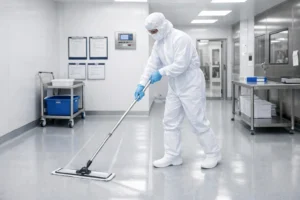
Standard janitorial mop buckets fail cleanroom qualification on four critical fronts. First, materials: commercial buckets use low-grade plastics or galvanized steel with rough surfaces, seams, and crevices that trap particles and bioburden-exactly the contamination you’re trying to remove. These materials shed particles under mechanical stress (wringer action, rolling movement) and degrade under pharmaceutical-grade disinfectants. Second, drainability: commercial buckets have flat bottoms with rounded corners that pool liquid, creating stagnant zones where bioburden accumulates between cleaning cycles. You can’t fully empty them, and you can’t validate that residual disinfectant won’t contaminate the next batch of solution. Third, weld quality and joint design: standard buckets use exposed welds, riveted joints, and threaded fasteners that create particle traps and can’t survive repeated autoclave cycles without corroding or loosening. Fourth, sterilization compatibility: most commercial buckets can’t withstand 121°C steam autoclaving or aggressive disinfectant rotation (alcohols, peroxides, hypochlorites) without warping, cracking, or off-gassing-disqualifying them from Grade A/B pharmaceutical use where sterile cleaning tools are mandatory.
GMP & ISO 14644 Contamination-Control Requirements
EU GMP Annex 1 requires that materials used in cleanrooms be selected to minimize particle generation and withstand repeated application of disinfectants and sporicidal agents. Specifically, cleaning and disinfection must follow a written, validated program; disinfectants and detergents used in Grade A/B areas must be sterile prior to use; and the cleaning process must remove residues that could inhibit disinfectant effectiveness. The regulation mandates use of more than one disinfectant with different modes of action, periodic sporicidal application, and ongoing monitoring for effectiveness and microbial flora changes. ISO 14644 provides the operational framework: cleanrooms are classified by airborne particle concentration limits (ISO Class 5 = ≤3,520 particles ≥0.5 µm/m³; Class 8 = ≤3,520,000), and all activities—including cleaning—must not compromise these limits. Your mop bucket system must support validated cleaning workflows without introducing particles, preventing complete drainability, or creating cross-contamination vectors during transfer between areas.
Design Differences: Welds, Joints, Drainability, Surface Finishing
Cleanroom mop buckets use continuous TIG welds (not spot welds) with full penetration and smooth bead finish, eliminating crevices and particle traps. Joints are welded or ultrasonically bonded (not riveted or threaded), and all internal corners have large-radius cove profiles (typically R10–15 mm) to eliminate dead zones where liquid pools. Drainability is engineered: buckets tilt or have sloped bottoms with drain ports positioned at the true low point, enabling complete fluid removal and preventing carryover contamination. Surface finishing matters—stainless steel cleanroom buckets receive electropolishing (removes surface roughness to Ra <0.5 µm) and passivation (chromium oxide layer prevents corrosion); polypropylene buckets are molded from medical-grade resin with smooth cavity finishes, avoiding secondary machining that creates surface defects. Frames and casters use cleanroom-compatible materials (stainless steel, anodized aluminum, non-marking thermoplastic wheels) with sealed bearings to prevent lubricant leakage and particle generation during transport.
Figure 2: Bucket configuration comparison illustrating fluid segregation principles. Single-bucket systems (left) create contamination feedback loops where soil returns to disinfectant reservoir, diluting active concentration. Dual-bucket systems (center) separate clean disinfectant from rinse water, preventing direct carry-back but allowing rinse water contamination. Triple-bucket systems (right) isolate contaminated effluent in dedicated waste bucket, maintaining disinfectant and rinse water integrity throughout cleaning cycles—critical for Grade A/B pharmaceutical areas where validated disinfectant concentration must be maintained.
Cleanroom Mop Bucket Configurations (1-, 2-, 3-Bucket Systems)
Single-Bucket System: When It’s Acceptable (ISO 7–8)
Single-bucket systems use one bucket containing disinfectant solution; the mop is dipped, wrung over the same bucket, and reapplied repeatedly. This configuration is not acceptable for achieving GMP-standard cleanliness in pharmaceutical manufacturing. Research shows single-bucket mopping reintroduces soil and microbes into the disinfectant solution with every wring cycle, rapidly diluting active concentration and contaminating subsequent floor passes. Microbial count reductions are markedly lower versus multi-bucket methods. The single-bucket approach might suffice in non-GMP industrial settings (warehouse offices, non-classified support spaces) but fails to meet EU GMP Annex 1 validation requirements for controlled disinfectant contact time and prevention of cross-contamination. Even in ISO Class 7–8 pharmaceutical packaging or gowning areas, regulatory expectations and contamination control best practices favor dual- or triple-bucket configurations.
Dual-Bucket System: Most Common for Pharmaceutical Areas
Dual-bucket systems physically separate clean disinfectant from rinse water. Bucket 1 holds the validated disinfectant or detergent solution; Bucket 2 contains clean rinse water with a wringer positioned above. The validated workflow: apply solution from Bucket 1 to the floor, return to Bucket 2 to rinse the mop and wring out contaminated liquid, then reload with fresh solution from Bucket 1. This interposed rinse step prevents carry-back of soil and bioburden into the active disinfectant, maintaining effective concentration throughout the cleaning cycle. Dual-bucket systems are suitable for ISO Class 6–8 pharmaceutical areas (Grade C/D manufacturing zones, personnel airlocks, gowning rooms, packaging suites) where validated disinfection is required but the risk profile permits a simplified workflow. They significantly outperform single-bucket methods in maintaining disinfectant efficacy and reducing microbial loads, and they’re the minimum configuration for GMP compliance in most pharmaceutical cleaning SOPs. However, the rinse water in Bucket 2 accumulates contamination over time, and the wrung-out liquid from contaminated mops can splash back, creating a secondary contamination source.
Triple-Bucket System: Required for Annex 1 Grade A/B/C Workflows
Triple-bucket systems add a dedicated waste bucket beneath the wringer, physically isolating contaminated effluent from both the rinse water and the active disinfectant. The validated sequence: mop the target surface with solution from Bucket 1 (disinfectant/detergent), return to the wringer positioned over Bucket 3 (empty waste bucket) and wring out the contaminated liquid, rinse the mop in Bucket 2 (clean water) and wring again into Bucket 3, then reload with fresh solution from Bucket 1. This protocol minimizes contamination of both the rinse water and the disinfectant solution, yielding superior cleaning and disinfection effectiveness compared with dual-bucket configurations—especially when combined with mechanical wringers that maximize fluid extraction. Industry guidance recommends triple-bucket systems for EU GMP Grade A/B aseptic processing areas and Grade C zones containing isolators, where contamination control margins are tightest and disinfectant efficacy must be maintained at validated levels throughout extended cleaning cycles. The waste bucket captures bioburden without reintroducing it to the cleaning system, enabling quantifiable validation of disinfectant concentration stability and microbial reduction performance.
How Each Configuration Affects Bioburden Control & Disinfectant Usage
Bucket configuration directly determines disinfectant dilution rate and bioburden accumulation. Single-bucket systems experience exponential dilution: each wring cycle adds dirty water back into the solution, reducing active ingredient concentration and increasing microbial load. After 10–15 floor passes, disinfectant concentration can drop below validated efficacy thresholds, and the bucket becomes a bioburden reservoir that recontaminates surfaces. Dual-bucket systems slow this degradation by rinsing mops in separate water before reloading disinfectant, but the rinse bucket still accumulates contamination and must be changed frequently (typically every 20–30 m² of floor area). Triple-bucket systems maintain disinfectant concentration stability across 50–100 m² of mopping by segregating waste effluent entirely; disinfectant consumption actually decreases because you’re not diluting the active solution with dirty rinse water. The trade-off: triple-bucket systems require more physical space, more operator training (strict sequence adherence), and more complex workflow validation—but they deliver reproducible disinfectant contact time and microbial reduction that withstands regulatory scrutiny. For high-risk pharmaceutical manufacturing (aseptic filling, lyophilization, isolator environments), the triple-bucket configuration is effectively mandatory.
Wringer vs Press Systems
Wringer mechanism type affects particle generation, fluid extraction efficiency, and autoclave durability. Roller wringers use two parallel rollers (metal or hard plastic) that compress the mop head as it passes between them; press-type systems use a perforated basket or cage that the operator presses downward against a plate, squeezing fluid through the perforations. Mechanical wringers (roller type with geared hand-crank or foot-pedal actuation) improve cleaning efficacy in multi-bucket systems by maximizing fluid extraction—wringing removes 80–90% of liquid versus 60–70% for manual press systems—which reduces carryover contamination between buckets and extends the useful life of rinse water and disinfectant solutions. However, roller wringers have more moving parts (bearings, gears, shafts) that can generate particles if not properly maintained, and older designs use exposed metal components that corrode under aggressive disinfectants. Press-type systems are mechanically simpler (fewer moving parts = lower particle generation risk), fully autoclavable when constructed from stainless steel or high-temperature polypropylene, and easier to clean/validate because there are no internal mechanisms to trap bioburden. For Grade A/B pharmaceutical areas where particle control is critical, specify press-type wringers with electropolished stainless steel or medical-grade PP construction, sealed drainage, and no exposed bearings. For Grade C/D areas where throughput matters, roller wringers with cleanroom-compatible bearings (sealed, food-grade lubricant) and corrosion-resistant construction offer faster operation. Autoclave compatibility is the determining factor: press-type systems are 100% autoclavable and show no performance degradation across 500+ steam cycles; roller wringers with plastic gears or unsealed bearings may require component replacement after 50–100 cycles.
Figure 3: Wringer mechanism comparison for particle generation and autoclave compatibility. Roller wringers (left) use gears, shafts, and bearings that maximize fluid extraction (80–90%) but generate particles from moving parts and require component replacement after 50–100 autoclave cycles. Press-type wringers (right) use simple perforated baskets with manual compression, offering lower fluid extraction (60–70%) but 100% autoclave compatibility across 500+ cycles with no moving parts to trap bioburden—preferred for Grade A/B environments where particle control is critical.
How Mop Buckets Reduce Contamination
Separation of Clean vs Dirty Fluids
Physical segregation of clean disinfectant, rinse water, and contaminated effluent is the core contamination control principle. When clean and dirty fluids mix—as in single-bucket systems—you create a continuous contamination feedback loop: soil and bioburden removed from the floor return to the disinfectant reservoir, reducing active concentration, increasing microbial load, and eventually recontaminating subsequent surface passes. Multi-bucket systems break this loop by dedicating separate vessels to each fluid stream. In dual-bucket setups, contaminated liquid wrung from the mop enters Bucket 2 (rinse water), where mechanical dilution and settling reduce bioburden before the mop is reloaded from Bucket 1 (clean disinfectant). In triple-bucket configurations, contaminated effluent is captured in Bucket 3 (waste), never mixing with either rinse water or disinfectant. This segregation enables quantitative validation: you can sample Bucket 1 throughout the cleaning cycle to verify disinfectant concentration remains above efficacy thresholds, and you can culture Bucket 3 waste to measure total bioburden removed—data that supports cleaning validation protocols and closes out audit findings.
Preventing Disinfectant Dilution & Residue Re-Deposition
Disinfectant dilution is the hidden failure mode in poorly designed bucket systems. Every milliliter of dirty water wrung back into the disinfectant bucket reduces active ingredient concentration. For quaternary ammonium compounds validated at 200 ppm, a 10% dilution drops you to 180 ppm—potentially below the minimum effective concentration against target organisms. For hydrogen peroxide sporicidal protocols (6% H₂O₂ with 10-minute contact time), dilution to 5.2% can invalidate your entire validation study. Triple-bucket systems prevent this degradation by ensuring that only clean, unused disinfectant enters Bucket 1; wrung-out liquid goes to waste, not back into the active solution. Residue re-deposition—the phenomenon where contaminated mop heads re-apply bioburden to previously cleaned surfaces—is prevented by the mandatory rinse step in Bucket 2. Soil particles and microbial cells trapped in mop head fibers are released into rinse water and wrung into waste, rather than transferred to the next floor section. This is why EU GMP Annex 1 requires cleaning before disinfection: removing gross contamination and residues ensures the disinfectant can reach validated contact time on clean surfaces, rather than being inactivated by organic load or physical barriers.
Minimizing Operator-Induced Particle Generation
Bucket system design affects how operators interact with the equipment, which directly impacts particle generation. Poorly designed buckets require awkward lifting, excessive bending, or forceful wringing—all of which increase operator movement and mechanical stress that releases particles from gowning materials and mop components. Cleanroom-optimized bucket systems use ergonomic features: foot-pedal wringers (hands-free operation reduces glove contact and particle generation), tilting bucket frames (eliminates lifting to empty waste), and mobile carts with locking casters (stable wringing platform prevents splashing). Wringer height and mop handle length are specified to allow operators to work in neutral postures without excessive reaching or stooping—critical in full aseptic gowning where range of motion is limited. Smooth fluid flow paths (wide bucket openings, drip shields, splash guards) prevent the aerosolization and droplet splatter that occur when wrung-out liquid hits bucket walls at high velocity. These design details matter in Grade A/B environments where unidirectional airflow must not be disrupted and particle generation from all sources—including cleaning operations—must be minimized to maintain ISO Class 5 particle limits.
Validating Bucket Systems During EM (Environmental Monitoring)
Environmental monitoring provides the evidence that your bucket system configuration delivers validated contamination control. EM protocols should include pre-cleaning and post-cleaning particle counts (viable and non-viable) at representative floor locations, with acceptance criteria tied to the target ISO class. For example, ISO Class 7 areas (≤352,000 particles ≥0.5 µm/m³ at rest) should show particle counts returning to at-rest levels within 15–30 minutes post-cleaning; sustained elevation indicates the cleaning operation itself is a particle source—often traced to inadequate bucket configuration or degraded mop heads. Microbial surface sampling (contact plates, swabs) before and after disinfection validates bioburden reduction; failure to achieve >3-log reduction typically indicates disinfectant dilution (single- or poorly managed dual-bucket system) or inadequate contact time. Trend analysis is critical: if particle or microbial counts increase over sequential cleaning cycles while using the same bucket configuration, your rinse water or disinfectant is becoming a contamination reservoir—the smoking gun for inadequate fluid segregation. Validate your bucket system by demonstrating that disinfectant concentration (measured via titration or test strips) remains above validated efficacy thresholds throughout a complete cleaning cycle covering your facility’s maximum floor area per bucket change-out. For foundational contamination control principles, see comprehensive cleanroom mop guide.
How Correct Bucket Design Reduces Audit Observations
Regulatory inspectors look for three bucket-related failure modes. First, inadequate fluid segregation: if you’re using single-bucket systems or dual-bucket setups without validated change-out frequencies, expect a 483 observation for cleaning procedures not validated to prevent cross-contamination. Second, non-sterile disinfectants in Grade A/B: Annex 1 explicitly requires sterile disinfectants and cleaning tools for aseptic areas; if your buckets and solutions aren’t pre-sterilized or autoclaved with documented SAL 10⁻⁶, that’s a finding. Third, lack of validation documentation: auditors will ask for your bucket system qualification protocol (IQ/OQ/PQ), cleaning validation study showing disinfectant stability and bioburden reduction across representative floor areas, and SOP defining bucket change-out frequencies, wringer maintenance, and operator training. Correct bucket design-triple-bucket for Grade A/B/C, autoclavable materials, complete drainability, validated cleaning workflows-provides the technical foundation to answer these questions with data. When inspectors ask “How do you ensure disinfectant concentration remains effective throughout the cleaning cycle?” you point to your triple-bucket segregation protocol and disinfectant concentration trend data. When they ask “How do you prevent cross-contamination between product batches?” you show them your validated bucket sterilization cycle and dedicated bucket inventory per manufacturing suite.
Recommended Bucket Materials: Stainless Steel vs Polypropylene (PP)
Stainless Steel (SS304 / SS316): Autoclavable, Longest Lifespan
Stainless steel cleanroom buckets use either 304 or 316 alloy, both offering full autoclave compatibility and long service life when properly maintained. SS316 provides superior corrosion resistance versus 304, particularly when exposed to sodium hypochlorite (bleach) disinfectants. Research shows hypochlorite ions aggressively attack stainless steel, causing pitting and crevice corrosion; however, 316 tolerates residual chlorine concentrations of 15–20 ppm for up to 24 hours when contact time is minimized, temperature remains ambient, and thorough rinsing follows exposure. For facilities using bleach-based disinfectant rotation (500–5000 ppm sodium hypochlorite), SS316 is the safer specification—though even 316 requires strict protocols (low concentration, brief contact, immediate rinse) to prevent corrosion.
Electropolishing and passivation are mandatory surface treatments: electropolishing removes surface roughness to Ra <0.5 µm, eliminating particle traps; passivation forms a chromium oxide layer that resists corrosion and chemical attack. Stainless steel buckets are 100% autoclavable at 121°C for 30 minutes across 500+ steam cycles without performance degradation—making them the gold standard for Grade A/B pharmaceutical facilities requiring daily sterilization. Continuous TIG welds with full penetration, coved internal corners (R10–15 mm radius), and smooth bead finish eliminate crevices and enable complete drainability.
The trade-off: stainless steel buckets cost 3–5× more than polypropylene equivalents upfront ($200–$400 per bucket versus $50–$100 for PP). However, SS316 service life extends 10–15 years in typical pharmaceutical use (assuming proper hypochlorite management), delivering lower TCO than PP buckets replaced every 2–3 years. Weight is a consideration—stainless frames and buckets are significantly heavier than PP, affecting operator ergonomics and cart maneuverability.
Cleanroom-Grade PP: Lightweight, Corrosion-Resistant
Polypropylene buckets are molded from medical-grade resin (density 0.855–0.946 g/cm³), offering lightweight handling, broad chemical resistance, and autoclave compatibility at lower upfront cost. PP resists most pharmaceutical disinfectants at room temperature: 70% isopropyl alcohol, 3–6% hydrogen peroxide, quaternary ammonium compounds, and moderate concentrations of non-oxidizing acids/bases can be stored and used in PP containers. PP shows better tolerance of high-concentration bleach versus stainless steel (no pitting risk), though oxidizers accelerate PP degradation over time.
PP buckets withstand repeated 121°C autoclave cycles—this is why medical and laboratory equipment uses PP extensively. However, repeated heat exposure causes thermo-oxidative aging: PP gradually embrittles, developing surface cracking, crazing, and loss of impact strength. Typical service life is 50–100 autoclave cycles before visible degradation (whitening, brittleness, micro-cracks) requires replacement—roughly 1–2 years in high-use pharmaceutical operations versus 10+ years for stainless steel.
The upfront cost advantage ($50–$100 per bucket) makes PP attractive for facilities with limited capital budgets, lower autoclave frequency, or single-use/disposable workflows. PP buckets are often specified for Grade C/D support areas, biotech pilot facilities, and multi-product manufacturers who segregate bucket inventory by product line to prevent cross-contamination. Weight reduction (PP buckets weigh 60–70% less than stainless equivalents) improves operator ergonomics and reduces physical strain during transport.
Chemical Compatibility Matrix
| Disinfectant Type | Stainless Steel (SS316) | Polypropylene (PP) |
| 70% イソプロピルアルコール (IPA) | Excellent; no degradation across 1000+ cycles | Excellent; stable at room temperature |
| 過酸化水素 (3 ~ 6%) | Excellent; verify concentration/temp limits | Good; degrades faster at >6% or elevated temp |
| Sodium Hypochlorite (500–5000 ppm) | Moderate; 316 tolerates 15–20 ppm with rinsing; higher concentrations require strict protocols | Excellent; no pitting risk; oxidative aging over time |
| Quaternary Ammonium Compounds | Excellent; broad compatibility | Excellent; stable with most QAC formulations |
| Autoclave (121°C, 30 min) | 500+ cycles; no performance loss | 50–100 cycles before embrittlement |
| Service Life (typical pharma use) | 10–15 years (with proper hypochlorite management) | 1–3 years (high-use); 3–5 years (moderate-use) |
| Upfront Cost (per bucket) | $200–$400 | $50–$100 |
| TCO (10-year lifespan) | $200–$400 (single purchase) | $200–$500 (3–5 replacements) |

Figure 4: Bucket material comparison matrix contrasting stainless steel SS316 (left) versus cleanroom-grade polypropylene (right). SS316 offers 500+ autoclave cycles, 10–15 year service life, and superior corrosion resistance (tolerates 15–20 ppm residual chlorine with rinsing) at higher upfront cost ($200–$400). PP provides lightweight handling (60–70% weight reduction), no pitting risk from bleach, and lower initial investment ($50–$100) but requires replacement after 50–100 autoclave cycles (1–3 years) due to thermo-oxidative embrittlement. Material selection depends on autoclave frequency, disinfectant chemistry, and facility TCO analysis.
Disinfection and Autoclave Cycle Impact on Material Stability
Autoclave cycle frequency directly determines PP bucket replacement cadence. Facilities autoclaving buckets daily (365 cycles/year) will see PP degradation within 3–6 months; those autoclaving weekly (52 cycles/year) extend PP life to 18–24 months. Monitor PP buckets for replacement indicators: surface whitening/chalking, brittleness (cracks when dropped or stressed), warping (buckets no longer sit flat or seal properly), and leakage at seams or bottom joints. Replace immediately when degradation appears—continuing use risks particle generation and contamination of cleaning solutions.
Stainless steel buckets show minimal degradation from autoclave cycles but require post-disinfection maintenance when exposed to hypochlorite: rinse thoroughly with DI water immediately after bleach contact, inspect for pitting or crevice corrosion quarterly, and repassivate if surface dulling or discoloration appears. Facilities using aggressive bleach protocols (>1000 ppm, daily exposure) should consider rotating to hydrogen peroxide or alcohol-based sporicidal agents to extend stainless steel service life.
How Material Choice Affects Long-Term TCO
For high-volume pharmaceutical manufacturing (daily autoclave cycles, large bucket inventory, 10+ year facility lifespan), stainless steel SS316 delivers lowest TCO despite 3–5× higher upfront cost. A facility using 20 buckets, autoclaving daily, will replace PP buckets 3–5 times over 10 years ($3,000–$10,000 total cost plus disposal and requalification labor) versus one-time stainless steel purchase ($4,000–$8,000 with no replacements). Factor in validation workload: every PP bucket replacement batch requires requalification testing (particle generation, chemical compatibility, dimensional stability)—QA labor that stainless steel avoids.
For low-volume operations (pilot facilities, R&D cleanrooms, infrequent autoclave cycles, <5-year project timelines), PP buckets offer better economics. A small biotech with 5 buckets, autoclaving weekly, will use PP for 18–24 months before replacement ($250–$500 upfront) versus $1,000–$2,000 for stainless—and the facility may scale or pivot before reaching PP end-of-life. For complete integrated mop systems, see buyer’s guide comparing bucket/mop/cart configurations.
Ideal Mop Bucket Setup for Pharma & バイオテクノロジー
EU Annex 1 Expectations for Grade A/B/C/D Cleaning Tools
EU GMP Annex 1 mandates that disinfectants and detergents used in Grade A/B areas must be sterile prior to use. This requirement extends to the buckets containing those solutions: either pre-sterilize buckets (gamma radiation, EO gas, autoclave with SAL 10⁻⁶ documentation) or implement validated in-house autoclave protocols. Grade A/B workflows require triple-bucket systems to maintain disinfectant concentration and prevent cross-contamination; Grade C areas containing isolators or high-risk processing also benefit from triple-bucket configurations. Grade C/D support areas (gowning rooms, packaging suites, airlocks) can use dual-bucket systems with validated change-out frequencies.
All buckets—regardless of grade—must use materials that minimize particle generation, withstand repeated disinfectant/sporicide application, and enable complete drainability. Coved corners, smooth surfaces, continuous welds, and tilting frames for waste removal are non-negotiable design features. Validated transfer disinfection is required when moving buckets between grades: buckets staged in Grade D must undergo surface disinfection before entering Grade C, and Grade C buckets require validated transfer protocols before Grade B entry.
Complete Bucket System Configuration (Buckets + Wringer + Frame)
A validated cleanroom mop bucket system integrates multiple components: buckets (clean disinfectant, rinse water, waste), wringer mechanism (press-type or roller), mobile cart frame (stainless or anodized aluminum with cleanroom casters), and auxiliary features (mop handle storage, glove/tool hooks, drip shields). For Grade A/B triple-bucket setup: configure Bucket 1 (5–10 L capacity) with sterile disinfectant, Bucket 2 (10–15 L) with sterile rinse water, and Bucket 3 (10–15 L) as empty waste collector beneath the wringer. Position wringer directly above Bucket 3 to capture all wrung-out liquid without splashing.
Cart frames must use non-marking, cleanroom-compatible casters (polyurethane or thermoplastic wheels, sealed bearings, locking mechanisms) that glide smoothly without generating particles or leaving floor marks. Integrated tool storage (mop handle clips, spray bottle hooks) keeps all cleaning implements on one mobile platform, reducing cross-contamination risk during room-to-room transport. Drip shields and splash guards around wringer zones prevent aerosolization of contaminated liquid.
SOP Integration: Disinfectant Rotation, Mop Change-Out, Waste Handling
SOPs must define validated workflows for each bucket system element. Disinfectant rotation: specify which disinfectants populate Bucket 1 by day/week (e.g., Monday/Wednesday = 70% IPA; Tuesday/Thursday = 3% H₂O₂; Friday = 1000 ppm bleach; weekly = sporicidal agent), validated contact times for each, and maximum in-use periods for prepared solutions. Mop head change-out: define frequency per area cleaned (e.g., replace mop head every 30 m² or when visibly soiled), segregation by grade (Grade A/B mops never used in C/D), and validated laundering/sterilization cycles between uses.
Waste handling: specify how Bucket 3 contents are disposed (chemical waste stream, drain to validated sink, biohazard protocol depending on manufacturing product), maximum fill volume before emptying (prevent splashing during transport), and decontamination requirements before bucket reuse. Color-code buckets and mop handles by grade or disinfectant type: blue for Grade A/B, green for Grade C, yellow for Grade D; or red for bleach, blue for peroxide, clear for alcohol. Visual management prevents operator errors that trigger cross-contamination.
Recommended Bucket Sizes, Fill Levels, and Label Coding
Bucket sizing balances disinfectant volume (sufficient for target floor area) against weight/ergonomics (operators can maneuver fully loaded carts). Grade A/B triple-bucket systems: 5–10 L capacity for Bucket 1 (disinfectant—smaller volume maintains concentration), 10–15 L for Bucket 2 (rinse water—larger volume accommodates multiple rinse cycles), 15–20 L for Bucket 3 (waste collector). Grade C/D dual-bucket systems: 10–15 L for both buckets. Fill buckets to 60–70% capacity (prevents sloshing during transport, allows room for wrung-out liquid in waste bucket).
Label coding must include: bucket function (Disinfectant / Rinse / Waste), target grade (A/B/C/D), disinfectant type and concentration, preparation date/time, expiry date/time (per validated in-use limits), and operator initials. Use waterproof, autoclave-stable labels (laser-etched stainless tags, high-temp polyester labels) that survive 121°C steam without fading or delaminating. Color-coded lids or bucket exteriors provide at-a-glance visual confirmation during fast-paced cleaning operations.
Visual Management: Color Coding for Room Classes and Workflows
Color-coding prevents the most common bucket system failures: using Grade C/D buckets in Grade A/B without re-sterilization, mixing disinfectant types, or exceeding validated solution in-use periods. Implement two-level coding: primary color indicates target grade (blue = A/B, green = C, yellow = D), secondary color indicates disinfectant family (red stripe = oxidizers like bleach/peroxide, blue stripe = alcohols, white stripe = quats). Train operators that buckets never move to higher grades without validated sterilization—visual cues reinforce procedural controls.
Alternatively, code by manufacturing suite or product line: purple buckets for Product A manufacturing, orange for Product B, gray for multi-product shared areas. This prevents cross-contamination between product campaigns and simplifies cleaning validation (each product line has dedicated bucket inventory, eliminating carry-over risk).
Autoclave Cycle Guidance for Buckets and Components
Autoclave buckets and wringer components separately from mop heads to prevent overloading and ensure steam penetration. Standard cycle: 121°C for 30 minutes minimum, gravity or pre-vacuum cycle depending on load density. Disassemble wringer mechanisms (remove press plates, roller assemblies) and orient buckets inverted or tilted to allow condensate drainage. Do not nest buckets (traps steam, prevents thorough heating); use autoclave racks that space buckets 5–10 cm apart.
Post-autoclave: allow buckets to cool in sterile storage (Grade C minimum) before use. If immediate use in Grade A/B is required, transfer buckets via validated pass-through or material airlock with validated transfer disinfection. Document each autoclave cycle (load contents, cycle parameters, biological indicator results, operator signature) per 21 CFR 211.182 equipment cleaning records. Requalify autoclave effectiveness quarterly with biological indicators (Geobacillus stearothermophilus spore strips) positioned in worst-case load locations (bucket interiors, wringer joints).
Validation-Friendly Workflow Checklist (GMP-Ready)
☑ Pre-use sterilization: Autoclave buckets, wringers, and frames at 121°C for 30 min (or vendor-supplied sterile consumables with SAL 10⁻⁶ documentation). Store sterilized buckets in Grade C or better until use. Prepare sterile disinfectants in cleaned/sterilized containers (Grade A/B requirement); monitor for microbial contamination and control in-use expiry.
☑ Qualification documentation: Maintain IQ (installation qualification) documenting bucket system design, materials, autoclave compatibility, and surface finish specifications. Complete OQ (operational qualification) defining disinfectant coverage, contact times, wringer performance, and validated change-out frequencies. Execute PQ (performance qualification) demonstrating particle count and bioburden reduction across representative floor areas, aligned to facility grades and EM acceptance criteria.
☑ Cleaning validation: Validate the bucket cleaning process to remove residues and debris that inhibit disinfectant effectiveness. Demonstrate disinfectant concentration stability throughout maximum floor area per change-out. Validate bioburden reduction (>3-log) via microbial surface sampling pre- and post-cleaning.
☑ Cross-room contamination prevention: Use validated transfer disinfection when moving buckets between grades (unidirectional flow: low-grade to high-grade only). Implement airlock protocols (door interlocks, separate material/personnel airlocks, flush with filtered air). Never open both airlock doors simultaneously. Segregate bucket inventory by grade (Grade A/B buckets never enter C/D without re-sterilization).
☑ EM acceptance criteria: Define particle count and microbial limits per ISO class (Grade A = air ≤5 CFU/m³, settle ≤1 CFU/4h, contact ≤1 CFU/plate; Grade B = air ≤10, settle ≤5, contact ≤5; Grade C = air ≤100, settle ≤50, contact ≤25; Grade D = air ≤200, settle ≤100, contact ≤50). Set alert/action levels; investigate excursions. Trend EM data to detect degradation (increasing particle counts correlating with cleaning schedules indicate bucket/mop system failure).
Validation-Friendly Cleaning Workflow (Expanded)
Step-by-Step Validated Workflow (ISO 5–8)
Preparation: Verify area grade status, EM sampling readiness, door interlocks, and pressure differentials. Stage triple-bucket cart via validated transfer disinfection. Don full aseptic gowning per grade requirements (Grade A/B = sterile gown, double-glove, face shield; Grade C/D = cleanroom gown, gloves, hair cover). Load Bucket 1 with sterile disinfectant (validated concentration, documented prep time), Bucket 2 with sterile rinse water, Bucket 3 empty. Attach sterile mop head to handle.
Execution: Apply disinfectant from Bucket 1 using overlapping S-pattern strokes covering 2–3 m² per pass. Return to cart; position mop over Bucket 3 (waste) and wring thoroughly. Dip mop in Bucket 2 (rinse water), agitate to release trapped particles, wring into Bucket 3 again. Reload mop from Bucket 1 (disinfectant). Repeat sequence for entire target area. Re-disinfect gloves every 10–15 minutes (spray with IPA, allow contact time, or change to fresh sterile gloves).
Contact Time: Observe validated disinfectant contact time before declaring surface “clean” (typically 3–10 minutes depending on agent and organism). Do not walk on wet surfaces until contact time elapses. For sporicidal agents, contact time may extend to 10–30 minutes; use sequential cleaning (mop one zone, allow contact time, then mop next zone while first dries).
Change-Outs: Replace mop head every 30–50 m² or when visibly soiled (whichever comes first). Change Bucket 2 rinse water every 20–30 m² (monitor turbidity; if rinse water appears cloudy, change immediately). Empty Bucket 3 waste when 70% full (prevents splashing). Disinfectant in Bucket 1 should last full cleaning cycle if triple-bucket protocol prevents dilution; monitor concentration via test strips.

Figure 5: Validated triple-bucket cleaning workflow for ISO 5–8 (Grade A/B/C) pharmaceutical areas. Sequence: (1) Load Bucket 1 with sterile disinfectant, Bucket 2 with sterile rinse water, Bucket 3 empty for waste; (2) Apply disinfectant using overlapping S-pattern strokes covering 2–3 m²; (3) Wring mop thoroughly over Bucket 3 to capture contaminated liquid without splash-back; (4) Rinse mop in Bucket 2 to release trapped particles and bioburden; (5) Wring again into Bucket 3, then reload from Bucket 1. This protocol maintains disinfectant concentration above validated efficacy thresholds throughout 50–100 m² cleaning cycles and enables quantitative validation via disinfectant concentration monitoring and waste bioburden culturing.
Disinfectant Contact Time Expectations
Validated contact times vary by disinfectant chemistry and target organisms. Alcohols (70% IPA): 30 seconds to 2 minutes for vegetative bacteria; ineffective against spores (requires sporicidal rotation). Hydrogen peroxide (3–6%): 5–10 minutes for broad-spectrum disinfection; 10–30 minutes for sporicidal activity. Sodium hypochlorite (500–5000 ppm): 5–10 minutes for bacteria and fungi; 10+ minutes for spores. Quaternary ammonium compounds: 5–10 minutes for general disinfection; ineffective against spores (pair with sporicidal agent). Validate contact times using ASTM E2197 (surface disinfection time-kill) or equivalent test methods on representative facility surface materials (epoxy floors, stainless steel, painted walls).
How to Avoid Residue Pooling
Residue pooling occurs when excess disinfectant accumulates in floor crevices, seams, or low-lying areas, creating sticky films that attract particles and interfere with subsequent disinfection cycles. Prevent pooling by wringing mop heads thoroughly (80–90% liquid extraction), using proper mopping technique (overlap strokes without over-wetting), and ensuring floors have proper slope/drainage (no flat dead zones). For areas with unavoidable low spots, use absorbent wipes or squeegees to remove excess liquid before contact time elapses. Residue buildup indicates inadequate rinsing (Bucket 2 contaminated, requiring more frequent change-outs) or disinfectant concentration too high (dilute per validated protocol).
Operator Technique Factors Affecting Contamination
Even with validated bucket systems, operator technique determines cleaning efficacy. Common errors: insufficient wringing between buckets (carries bioburden into rinse water and disinfectant), skipping rinse step (leaves organic load on mop, reducing disinfectant contact), walking on wet surfaces before contact time expires (redistributes bioburden), touching non-disinfected surfaces while wearing contaminated gloves (cross-contamination vector), and overfilling buckets (sloshing during transport spreads contamination).
Training must include hands-on demonstration: proper S-pattern overlapping strokes (ensures full coverage without gaps), wringer actuation technique (maximize fluid extraction without splashing), bucket transport (stable cart movement, locking casters during wringing), and glove re-disinfection frequency (every 10–15 min or after touching non-cleaned surfaces). Qualify operators annually via practical assessment; observe cleaning operations quarterly to identify technique drift.